Getting Started With WordPress
Editing a website using WordPress can prove to be a very confusing if not a daunting task. Due to more and more of our clients requesting websites that they can edit themselves, we decided to create a WordPress Guide for our clients to refer to when they're getting started.
There are two main ways of publishing content:
PAGES: These tend to contain more Static - less frequently changed - types of content - [ For example an annual list of Competitions.]
POSTS: Diary or short article types of content - [ For example - The Results of each competition - adding a new Post for each. ]
Before getting started... it is good practice to keep all the files to be used in one folder on your PC - Such as My Documents - Web Site - so that everything is in one place. It's is also good practice to name images and documents all in lowercase and using hyphens - or underscores _ instead of spaces. i.e. "Joey's Wedding.JPG" becomes "joeys-wedding.jpg". Give everything a unique and meaningful name not only will this help in the indexing of the site with search engines but will make searching for items simpler in the future.
Below is a list of links to the areas we'll cover to save you having to sift through lots of text to find just one piece of information, although we do recommend reading through if you are completely new to WordPress. The possibilities of using WordPress are pretty vast, however we've tried to condense everything into just explaining the most used features.
If there is anything we haven't included that you would like to know regarding editing with WordPress, or perhaps a section you find hard to understand, please do let us know either by phone: 01671 830 541, or by email: info@kirkmoor.com and we'll edit this document following your requests.
- Logging In
- The Dashboard
- Sidebar Menu
- Uploading images, videos and files to the Media Library
- Adding a New Page
- Adding images, videos and/or files to a page
- Uploading and Linking to a File (PDF - Word Doc)
- Creating a New Post
- What Are Categories?
- Adding a New Category
- Assigning a Category to a Post
- Creating a Photo Gallery
- Logging Out
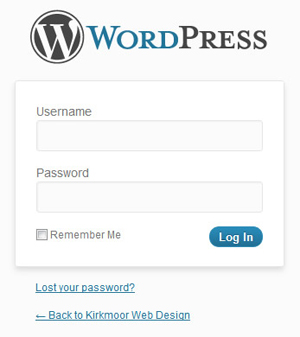
Logging In
To log in you type the URL (web address) that we sent you - usually a click-able link in an email. It's worth bookmarking/adding this page to your favourites on your browser to save you having to remember the URL or finding the email each time you'd like to access the page. The URL is usually the domain of your website followed by '/wp-admin', e.g. www.example.com/wp-admin
Once you have typed in the relevant URL, you should see your log in screen to type in your username and password:
Once you have logged in you will see your main administration screen, otherwise known as your 'DashBoard':
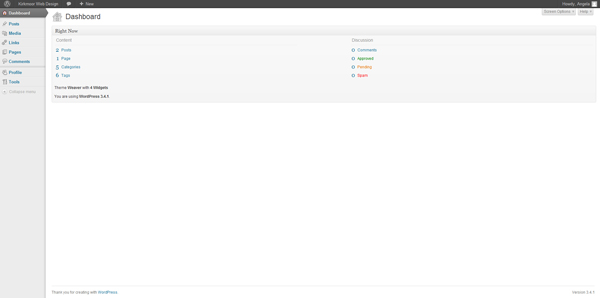
The House Icon and "Dashboard" at the top-left corner confirm that you are on the main administration screen, and you can also see the name of your site on the black bar above, which if you hover over you have the option to view your website.
On the top-right corner of the screen, on the black bar you’ll see your log in name, and below that, there is a “Screen Options” button. Screen Options is there for you to customize your Dashboard into how you want it to look and to display only the information you want or need. If you click “Screen Options” you’ll see it is an expandable and collapsible menu that presents you with options of what is showing on your dashboard in a tick box format. All the boxes correspond with a widget on the Dashboard. If you un-tick any of the boxes, the corresponding section will be hidden, but don’t worry – they are not deleted - if you change your mind you can re-tick any of the boxes to show any of the widgets on the Dashboard.
Within Screen Options you can also choose how many columns you view you Dashboard in. Don’t be scared to play around with any of these settings, because you always have the option to change things back to the way they were.
The Dashboard
If you choose to display everything on the Dashboard, it can look a little daunting at first however the following image breaks down what each section is:
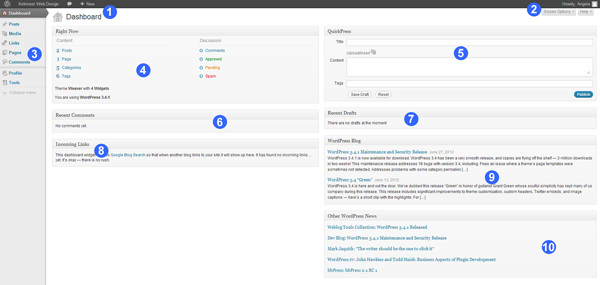
- The House Icon and ‘Dashboard’ at the top-left corner confirm that you are on the main administration screen, and you can also see the name of your site which if you hover over you have the option to view your website.
- On the top-right corner of the screen, on the black bar you’ll see your log in name, and below that, there is a “Screen Options” button – described above.
- The sidebar menu contains links to different areas allowing you to edit your site, for example writing/editing posts, uploading new pictures etc. To read more about the sidebar menu, click here.
- This section displays information about statistics about your website, e.g. the number of pages and categories your website contains.
- QuickPress is a rapid way to publish posts and images to your site.
- This is good if you like to monitor comments so that you can keep up to date and reply to them if you wish.
- If you have saved drafts they will show up in this section. Drafts are posts you’ve created however they haven’t been published to your website yet.
- This section displays the latest news from the Wordpress Blog, which is usually about updates and technical stuff.
- This section shows incoming links from other blogs. The more sites that link to your page the better.
- Here you can view news from the WordPress Community which consists of all WordPress related topics.
Each section on the Dashboard (everything listed above apart from #1-3) is called a ‘Widget’. If you choose to have many widgets displaying on your Dashboard, you can minimize/maximize them by clicking the top of the box – this can help de-clutter the Dashboard. You can also drag & drop the widgets around the Dashboard to change the order in which they appear.
The Sidebar Menu
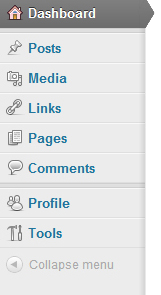
- Dashboard - Takes you back to the main administration screen
- Posts - Generally used mainly for blogs and/or web pages containing content that will change quite frequently. Posts are entries listed by date in reverse chronological order.
- Media - This is where you can upload and store any images, videos and files for use in your website. You can browse through the library to see what content has already been uploaded, and if any you can see which files are attached to which pages.
- Links - Used for adding links to your site which can be displayed in different way depending on your requirement.
- Pages - This contains all the individual static web pages on your website. You can view/edit them if you follow this link on the menu.
- Comments - Usually only for blog websites. These are comments left by people on images or posts made by you.
- Profile - Allows you to edit your profile by choosing the colour scheme of your Dashboard, adding any further information about yourself if you wish. The profile settings won't change anything on your actual website, just your work area in WordPress.
- Tools - You’ll more than likely never use this option. This allows you to import content from other sources, export your own content or upgrade your WordPress software.
Most users will normally only use the 'Media' and 'Pages' links. It’s definitely worth taking the time to navigate through all the different menus and links before adding and editing content. Without familiarising yourself with the main layout and navigation of WordPress, it may make things appear much more confusing than they need to be.
Adding Content to the Media Library:
Uploading an image/video/file:
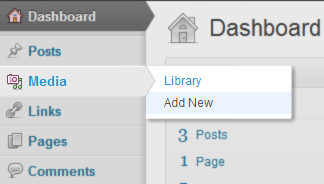
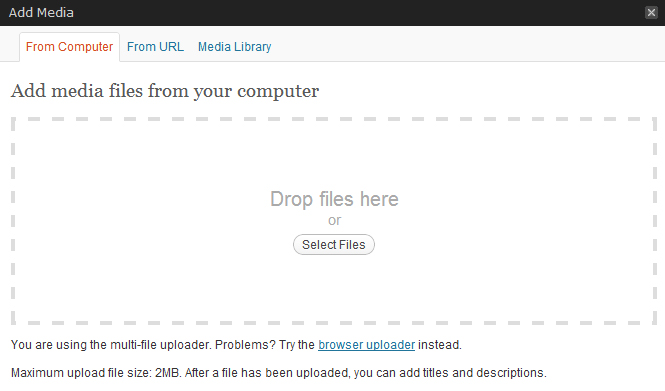
Hover over 'Media' on the sidebar menu and click 'Add New'.
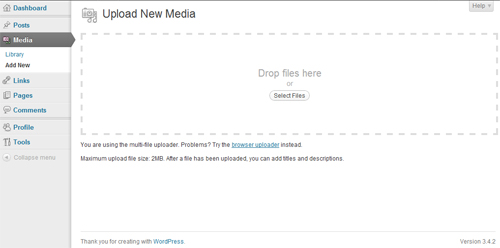
Either drag and drop your chosen files within the dotted rectangle, OR click the ‘Select Files’ button and select your image from where it is stored on your computer.
-
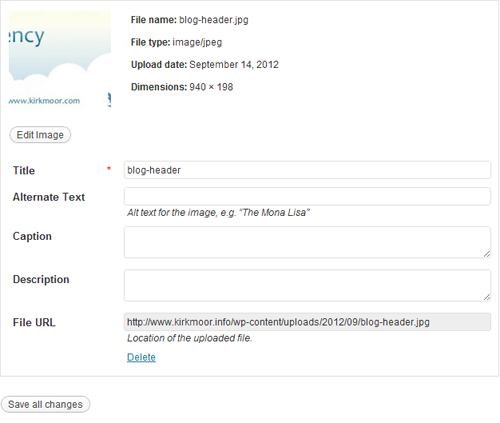
Once the file is downloaded you’ll notice a box appear below. Fill in the ‘title’ box - if it's an image file, fill the the ‘alternate text’ box too. Alternate Text is a more descriptive version of the title, but note that this isn’t the same thing as a caption. Click the ‘Save all changes’ button at the bottom of the page.
-
You will then see your image listed in your Media Library. If you want to upload more you can click on ‘Add New’ next to the Media Library page title at the top and go back to Step II.

Adding a New Page to your Website:
- Hover over ‘Pages’ on the sidebar menu and click ‘Add New’.
- You’ll be taken to a new page where you can enter the title of your new page, and then below the page title you’ll see a large empty box (highlighted in yellow below).
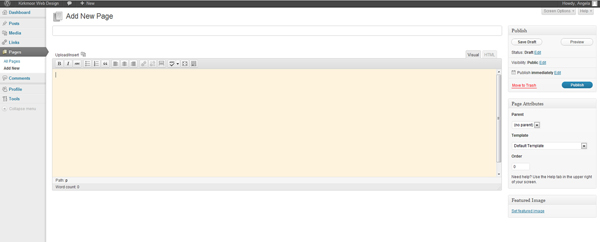
The boxed-area (highlighted in yellow above) is the main text box where you type your main body of content for the page. The two tabs on the right of this text box are called "Visual" and "HTML". Make sure the Visual tab is selected, unless you intend to go into the HTML code. Just above where you type, you’ll see a toolbar with different options for editing your text:

- Bold allows you to type/change text in bold.
- Italics allows you to type/change text in italics.
- Strike Through allows you to type/change text with a strike through the text.
- Bullet Points are good if you’re creating lists.
- Numbered Bullet Points are for creating numbered lists.
- Blockquote indents text.
- Align Left aligns your text to the left.
- Align Centre aligns your text to the centre.
- Align Right aligns your text to the right.
- Add Link allows you to add a link: To create a link, highlight the text that will form the link and click the Add Link button (the chain icon), then enter the link address and specify whether you want it to open in a new window or a new tab.
- Unlink allows you to remove a link
- Insert More Tag is a setting for blog posts. It controls how much of a blog post preview readers can see.
- Spell Checker does what it says on the tin.
- Full Screen Mode isolates your text area so that there’s nothing else surrounding it. To exit full screen mode click the ‘Exit Full screen’ link at the top left of the screen (you have to move your mouse to see it).
- Kitchen Sink allows you to display more editing options:

- The Drop Down Menu determines the format of your text:
- Paragraph is used for all paragraphs/sentences on your page. This is the most frequently used option out of the list
- Address is used if you're showing a postal address. It displays the text in an italic format.
- Preformatted puts your text in a grey box.
- Heading 1-6 are settings you'd use for titles and important headings on your page. Heading 1 is the largest and Heading 6 is the smallest.
- Underline allows you to add an underline to text.
- Align Full makes the edges of your selected text to be perfectly aligned at the edges.
- Select Text Colour allows you to change the colour of your text from the default Black.
- Paste as Plain Text provides a pop out box where you can paste text from somewhere else that you want to include on your page.
- Paste from Word provides a pop out box where you can paste text from a Word document that you want to include on your page.
- Remove Formatting removes any bold, italic and/or strikethrough settings on selected text to reset it to normal plain text.
- Insert Custom Character gives you a wide variety of characters that you don't have on your keyboard, such as shapes and foreign letters.
- Outdent brings text back to the very left of the page
- Indent brings text to the right slightly
- Undo is good if you make a mistake and want to undo it, allowing you to go back a step and redo.
- Redo is handy if you select Undo but then change your mind and want to redo something.
- Help provides further information and help.
To preview any changes and/or additions you've made to your page, on the right of the page you'll notice a 'Preview' button. If you click this, a preview of your page will appear in a new tab/window in your browser. If you're happy with the changes, you can go back to the previous tab and select the blue 'Publish' button which will then make your page go live, i.e. online where everyone can see.
Adding an image/video/file to a page
Navigate to the page you want to edit: Select 'Pages' from the Sidebar Menu and then select the particular page from the list you can see.

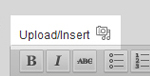
- Once you are on the page you want to edit, select ‘Upload/Insert’ which is below the title and above the text-box toolbar:
A window will open with 4 tabs across the top: "From Computer", "From URL", "Gallery" and "Media Library" - if you haven't used any images yet, then the Gallery option won't appear. If you haven't uploaded any media yet, then you'll have to choose between "From Computer" or "From URL". For whichever option you choose, make sure the file has a 'title' and remember to fill in the 'alternate text' box for accessibility reasons. Also, next to ‘Link URL’ click ‘None' IF the file is an image, otherwise leave the link as is.
- If uploading "From Computer": you can either drag and drop your chosen files within the dotted rectangle OR click the ‘select files’ button and select the file from where it resides on your computer.
- If uploading "From URL": specify whether it is an image or another type of file. Type/copy the URL of the website from where the media you want to insert is (e.g. a YouTube video). Fill out the rest of the settings to your preference, and then click "Insert into Post".
- If adding media from "Gallery" OR "Media Library": you'll see a list of media you've previously used, perhaps on other pages. Find the file you'd like to insert and click "Show" on the right hand side. Fill out the settings to your preference then click "Insert into Post".
To preview any changes made before publishing you page, click the ‘Preview’ button at the top-right of the page (under screen options and username). The preview should open up in a new tab on your browser. If not happy with how it is appearing, hover your cursor over the image/file and click on the Edit Image icon (top left), and alter the settings until you are happy.

Once happy with your edit, select the blue ‘publish’ button on the right. Now everyone can see your changes.


When you publish a page it means that it goes online and everyone is able to view it. Every time you make any changes to your page (no matter how big or small) you should always preview before publishing. If you don’t publish after making changes, nobody will be able to view your changes.
Uploading & Linking to Document
Sometimes you may want to link though to a pre-prepared document -such as a PDF or Word Document.
In general PDF is the better option as this will be readable by the majority of users.
- Upload the PDF using the Media Library Upload as above.
- Open your Page or Post and click where you want the link to appear on the page.
- Click the Small Camera Icon at the top of the Text box (Upload/Insert)
- From the Add Media Popup select 'Media Library'
- You will now see a list of files you have previously uploaded - select the 'Show' link for your document.
- Change the text in the Title box to suit - This will be the text that will appear as the link e.g. "Click Here to download the Menu"
- Click the Insert into Post button - Check the link and text are as you want them then
- Click 'Publish' to update the page when finished
Creating a New Post
Posts are entries made to a blog that display in chronological order. To create a new post:
- Select 'Posts' from the Sidebar Menu.
- Click 'Add New'.
- Similar to creating a new page, you'll see the format is very much the same for creating a new post. Fill in the title, and write up your content.
- Below the main text area, you'll see a series of tick boxes. Read/tick through as necessary.
- On the right side of your screen you'll see a widget called 'Categories'. In this widget you'll see more tick boxes next to a list of subject areas. Tick the ones that are relevant to your post.
- Once you have finished editing, select 'Preview' on the right. A new window/tab will appear in your browser displaying your newly edited Post.
- If happy with how your new post appears, return to the previous tab/window and select the blue 'publish' button.
What Are Categories?
Categories are used to organise all of your Posts into groups with specific subject areas. Having Categories is a quick way to inform readers what a post is about, as well as making it easier for users to find content that they want to read about and find all related posts under a particular topic. Every post you create is associated to one or more Categories. You can assign multiple Categories to cross-reference your posts.
You are also able to create hierarchies amongst your Categories by assigning a Parent or Child status to them. For example, you could have a Parent Category called "Cooking Recipes" and there could be several Child Categories attached such as "Vegetarian Dishes", "Seafood Dishes", "Starters", "Desserts" etc. So if a user wanted to view ALL recipes, they would select the Parent Category "Cooking Recipes", however if a reader was a vegetarian they would be more likely to select the Child Category "Vegetarian Dishes" to filter out all of the other non-vegetarian recipes.
Adding a New Category...
- ...whilst editing a post:
- On the right of your screen you'll see a widget called 'Categories'. At the bottom of this widget you should see a link: "+ Add New Category". Click on this link.
- Fill in the name of the new Category and from the drop-down menu below, select whether it is to be a Parent Category or to be a Child Category of an existing Category.
- Click the 'Add New Category' button.
- ...from the Sidebar Menu:
- Hover over the 'Posts' link.
- Select 'Categories.
- Fill in the name of your new category.
- Underneath the 'Name' box you'll see a box called 'Slug'. If the Name of your category is just one word, just write that same word into the Slug box ensuring all letters are lower-case. If the name of your category has more than one word, in the Slug box you would replace any spaces with a hyphen and ensure all letters are lower-case. For example if the name of your new category is "Cooking Recipes" the slug version could be "cooking-recipes".
- Beneath the Slug box, there's a drop-down menu where you either assign your new Category to be a Child of an existing Category, or make it a Parent Category.
- Lastly there is a Description box which is completely optional to fill in.
- Once you've filled in the necessary fields, click the 'Add New Category' Button.
Assigning a Category to a Post
- From the Sidebar Menu click on 'Posts' and select which Post you'd like to edit from the list.
- On the right of your screen you'll see the Categories widget which contains a list of all your existing Categories. Tick all the Categories that your post applies to.
- Click the blue 'Publish' button above.
Creating a Photo Gallery
We recommend that you resize the images you want to use to a specific uniformed size before uploading to the Media Library. If you upload pictures that are very large, this can result in your page taking ages to load.
- Open the page you want to add a Photo Gallery to. If you are creating a new page, please refer to 'Adding a New Page' and make sure you add title and save it at least before trying to add a Photo Gallery.
- Select 'Upload/Insert' which is below the title and above the text-box toolbar.
Logging Out
At the top-right of your screen (on the black bar) you'll see the text "Howdy, (username)". If you hover over that text, you'll see a drop down menu. Select 'Log Out'.